

Progressing Load and the OPT Model
Progressing Load and the OPT Model
Progressing load in the Strength Level of the OPT Model using repetitions in reserve (RIR)
You know the NASM OPT Model. You passed your certification. But every week, you face the same question: "Should I add weight? How much?" And if you're honest—you're guessing.
Maybe you add five pounds because that's what you did last time. Maybe you stick with the same weight because your client looked tired. Maybe you follow some percentage chart that ignores the fact they slept four hours last night.
The result? You're either leaving gains on the table or pushing too hard—watching form break down and progress stall. Clients plateau. They get frustrated. And you feel like you're flying blind despite being a certified professional.
Here's what happens next: clients lose trust and cancel. Your business suffers. Or you spend months spinning your wheels with inconsistent progress until burnout wins.
You deserve better than guesswork.
That's where Reps in Reserve (RIR) comes in. Instead of asking "what should I lift based on last month's test," you ask "what can I actually do TODAY based on last week's performance?" RIR automatically adjusts for sleep, stress, recovery, and training experience—everything percentage-based systems miss.
The result? Confidence. You know exactly what to do every session. Clients make steady progress. No more 2am programming anxiety. Just systematic results that actually work.

Why RIR-Based Progression Works
Here's why this matters: the rate of strength development differs dramatically depending a lot of factors including your gender, genetics, and how long you have been training. Strength progression follows logarithmic patterns with session-to-session gains for beginners (0-6 months), weekly gains for intermediates (6mo-2yrs), and monthly gains for advanced lifters (2-5yrs). RIR-based progression accounts for this reality by allowing weekly adjustments to training loads relative to each person's fitness level and rate of adaptation.
The key principle is straightforward: how close you get to failure should determine how much you adjust the load next week. Get way more reps than planned? You left gains on the table—load up. Fall way short? You bit off more than you could handle—back it down. It's just that simple.
Prerequisites: Movement Quality First
Before diving into load progression, let's be clear: RIR-based training assumes you've addressed fundamental movement impairments. If you're new to training or returning after time away, Phase 1 (Stabilization Endurance) isn't optional—it's essential. Loading dysfunctional movement patterns doesn't build strength; it builds compensations and injury risk.
Once movement quality is established, you're ready for the Strength Level and RIR-based progression.
The Last Set RIR Protocol
Here's how RIR-based load progression works in practice: your last set tells you everything you need to know about next week's loading. Don't train to failure---train with reps in reserve and use that information to make smart adjustments.
Why the last set instead of every set? Simple: it's your truest measure of capacity. The last set represents your performance under accumulated fatigue—a more accurate reflection of your actual strength than individual sets taken fresh. Plus, constantly adjusting loads between sets burns mental bandwidth and makes tracking inconsistent week to week. One assessment per exercise keeps progression simple and reliable.
The process is straightforward. After you complete your final set of an exercise, ask: "How many more reps could I have done with perfect form?"
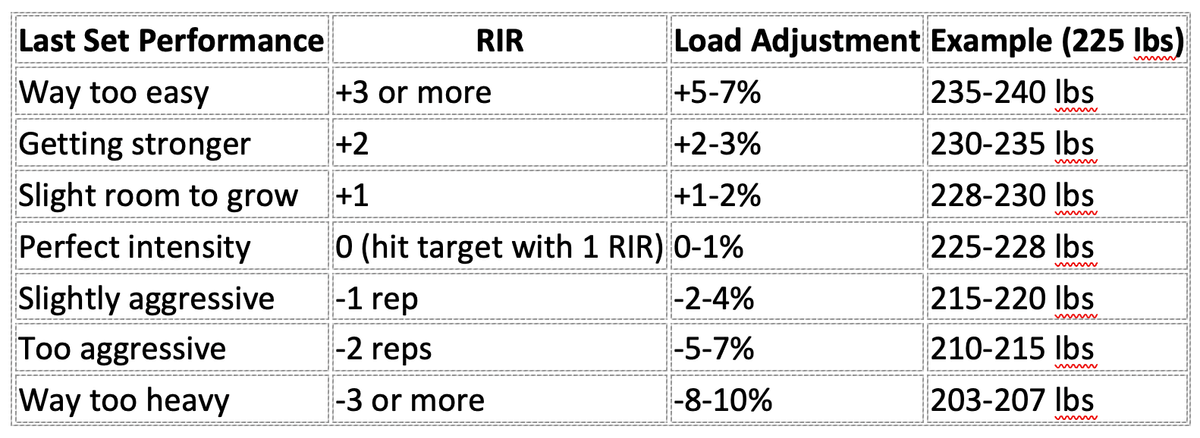
Example: You have 4 sets of 8 reps at 225 pounds on barbell bench press. On that last set:
- You hit 8 reps but could have done 10 (+2 reps in reserve): You're getting stronger. Add about 5 pounds next week.
- You struggled to get 6 reps (-2 reps from target): The load is too aggressive. Drop 5-10 pounds next week.
- You hit exactly 8 reps with 1 rep left in the tank: Solid intensity. Keep the same weight or add the smallest increment possible.
The beauty of this system: You're not guessing based on how you "looked" or how you "felt." You have concrete data---actual reps performed versus reps in reserve---that directly informs your progression decision.
Now that you know HOW MUCH to adjust loads based on last-set performance, let's talk about WHY percentage-based adjustments work better than fixed weight jumps.
Why Percentage Adjustments Scale With Strength
Adding 5 pounds to a 250-pound squat is barely noticeable. Adding 5 pounds to a 95-pound squat is a completely different story. That's why percentage-based adjustments work better with your RIR assessments---they scale the challenge to the person's current strength level.
When you assess +2 reps in reserve, a 2-3% load increase means 7.5 pounds for the strong squatter and less than 3 pounds for the developing one. Both get challenged appropriately based on their actual performance capacity.
Applying RIR to Each Strength Level Phase
Each phase has specific goals that require different approaches to load progression. The last-set RIR protocol stays the same, but how you apply the adjustments changes based on what each phase is trying to accomplish.
Here's what the research tells us: training at 1-3 RIR produces similar strength gains as training to failure, but with substantially less fatigue accumulation. This means better performance across all your sets, faster recovery between sessions, and the ability to complete your planned volume week after week. The closer you push to failure, the more exponentially fatigue increases without proportional gains in results. That's why each phase has specific RIR targets optimized for its goals.
Phase 2: Strength Endurance - Building Integration Under Fatigue
Target: 2-3 RIR on strength exercises
Phase Goal: Teach stability and strength to work together. You learn that being strong isn't enough---you need to maintain proper movement patterns when you're tired.
How Load Supports This Goal: The superset structure creates a specific type of fatigue. The first exercise challenges the prime movers' force output; the second exercise demands the stabilizers control posture under fatigue. Load progression ensures both components continue to improve together.
Applying RIR Protocol: Assess your last-set RIR on the strength exercise only. The stability exercise load is secondary---focus on completing all reps with perfect form. If you can't maintain technique on the stability exercise, the strength exercise load was too aggressive, regardless of RIR assessment.
Phase-Specific Considerations: Start conservative on strength exercises. You want to finish with 2-3 reps in reserve so you have the capacity to perform the stability work properly. Only increase loads when you can complete both exercises in the superset with good form.
Phase 3: Muscular Development - Volume Accumulation for Growth
Target: 1-2 RIR consistently
Phase Goal: Build muscle and work capacity through systematic volume accumulation. Every set contributes to weekly volume totals that drive hypertrophy adaptations.
How Load Supports This Goal: Load must be challenging enough to stimulate growth but not so heavy that it compromises volume completion. Missing sets due to excessive fatigue reduces total volume and limits adaptation.
Applying RIR Protocol: Target 1-2 reps in reserve on your last sets. Use RIR assessment to ensure loads allow complete volume execution week after week. If RIR drops below 1 consistently, reduce loads to protect volume accumulation.
Phase-Specific Considerations: Volume progression takes priority over load progression. When you can complete all planned sets and reps with 1-2 RIR consistently, add volume before adding load. Only increase loads when you've maximized practical weekly volume.
Phase 4: Maximal Strength - Neural Drive and Force Production
Target: 1-2 RIR, occasionally 0 RIR
Phase Goal: Develop maximum force production capacity. Train the nervous system to recruit maximum motor units and optimize the phosphocreatine energy system.
How Load Supports This Goal: Load is the primary stimulus. Every rep should challenge maximum force production capabilities. Volume is secondary---quality of each rep at maximum loads drives neural adaptations.
Applying RIR Protocol: Still assess RIR, but expect lower rep counts due to maximum loads. +1 rep in reserve might indicate need for load increase. Missing target reps by 1-2 indicates need for load reduction. Perfect technique is required regardless of RIR—if form breaks down, the load is too heavy even if you technically hit your rep target.
When to Use 0 RIR: Reserve true 0 RIR attempts for the final week of the phase or when testing your capacity. Most training weeks should stay at 1-2 RIR to preserve technique and allow for consistent training frequency. Going to 0 RIR every session creates excessive neural fatigue that compromises subsequent workouts.
Common Mistakes to Avoid:
- Carrying over Phase 3's higher RIR expectations—maximal loads require a different intensity approach
- Cutting rest periods short—incomplete phosphocreatine recovery means you're not actually training maximal strength
- Sacrificing technique for load—a rep doesn't count if it compromises position
Phase-Specific Considerations: Small, consistent load increases are the primary metric. A successful week means moving more weight than last week. Rest periods must be complete---3-5 minutes minimum, longer if needed for full phosphocreatine recovery. If you need 7 minutes to feel ready for your next set, take 7 minutes.
Implementation Guidelines
Week 1 of Any Phase: Establish baselines using the last-set protocol. Focus on movement quality and determining appropriate starting loads rather than pushing limits.
Weeks 2-3: This is where steady RIR-based progression should occur. Consistent improvement in load or reps indicates proper programming.
Week 4: Expect some fatigue accumulation. RIR might decrease or progression might slow---this is normal and signals time for a deload or phase transition.
Between Phases: Don't assume loads transfer directly. Different rep ranges and movement patterns require recalibration using the RIR protocol to establish new baselines. Example: Your Phase 2 barbell squat at 185 lbs for 12 reps with 2 RIR doesn't predict your Phase 3 starting weight for 8 reps. Start Week 1 of the new phase conservatively and let the RIR protocol guide progression.
Use RIR Only for Primary Compound Movements: Apply the last-set RIR protocol to your big lifts—squat, deadlift, bench press, overhead press, and major rowing variations. Skip it for accessory and isolation work. Why? Three reasons: (1) Compound movements recruit the most muscle tissue and create the most systemic fatigue, so load precision matters most here. (2) Tracking RIR on every cable fly and leg extension becomes tedious and adds zero value. (3) Your mental bandwidth is limited—save it for exercises that move the needle. Example: Track RIR on your barbell back squat and Romanian deadlift, but don't bother with leg extensions and hamstring curls. Push those accessories hard (0-1 RIR is fine), but don't waste energy calculating percentages for next week.
Keep the Same Exercise: Weekly RIR assessments only work when you're tracking the same exercise. Don't compare your barbell back squat performance to your front squat performance—even though they're both squats, they have completely different stability and mobility demands that change your force output. Track each exercise independently. Example: You can't compare Week 1's barbell back squat (8 reps at 2 RIR with 225 lbs) to Week 2's front squat (8 reps at 2 RIR with 185 lbs) and conclude you got weaker. Different exercise, different baseline.
Keep the Same Program Structure: The way you organize your workout affects last-set performance. If you're doing straight sets with 2 minutes rest between exercises (horizontal loading), your RIR will look different than if you're cycling through multiple exercises with minimal rest (vertical loading/circuit training). Don't change your program organization mid-phase and expect RIR comparisons to stay accurate. Structure consistency matters as much as exercise consistency. Example: Week 1 you do 4 straight sets of bench press with 2-minute rests and hit 8 reps at 2 RIR with 205 lbs. Week 2 you superset bench press with rows and can only hit 6 reps with the same weight. The drop isn't because you got weaker—you changed the fatigue context.
Rest Period Management: Incomplete recovery between sets compromises RIR assessment accuracy. Phase 2 needs 60-90 seconds between complete supersets. Phase 3 requires 2-3 minutes between sets. Phase 4 demands 3-5 minutes minimum. When in doubt, wait longer. Example: If you rush into your final set of squats with only 90 seconds of rest when you needed 3 minutes, you might hit 6 reps at 0 RIR when full recovery would have given you 8 reps at 2 RIR. Now your data is skewed for next week's programming.
Difficult Training Days: If performance drops due to poor sleep, stress, or life factors, reduce loads for that session but return to prescribed progression the following week. This is where RIR-based training excels—it automatically adjusts for daily readiness. Your nervous system doesn't care what the program says you "should" lift; it only responds to what you actually can lift today. A 2-RIR set on a bad day might be 20 pounds lighter than on a good day, and that's fine. The goal is long-term progress, not perfect adherence to daily targets. Example: Last week you deadlifted 315 lbs for 5 reps at 2 RIR. This week you slept 4 hours and feel terrible. You drop to 285 lbs, hit your 5 reps at 2 RIR, and move on. Next week when you're recovered, you'll likely return to 315 lbs or higher.
Remember: the best program is one you can execute consistently with progressive overload. The RIR-based load progression protocol ensures this happens by matching load adjustments to actual performance capacity, making every phase of the Strength Level work as intended.